Introduction:
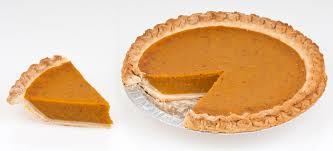
Pumpkin pie is a beloved dessert, especially during the fall and holiday seasons in the United States. Its rich, creamy filling and perfectly spiced flavor make it a staple at Thanksgiving dinners and other festive gatherings. In this article, we will walk you through a classic pumpkin pie recipe that is sure to become a family favorite. Whether you’re a seasoned baker or new to pie-making, our step-by-step guide will help you create a delicious and impressive pumpkin pie.
Ingredients:
For the Crust:
- 1 1/4 cups all-purpose flour
- 1/2 teaspoon salt
- 1/2 cup unsalted butter, chilled and cubed
- 1/4 cup ice water
For the Filling:
- 1 (15-ounce) can pumpkin puree
- 1 (14-ounce) can sweetened condensed milk
- 2 large eggs
- 1 teaspoon ground cinnamon
- 1/2 teaspoon ground ginger
- 1/2 teaspoon ground nutmeg
- 1/2 teaspoon salt
- 1/4 teaspoon ground cloves
For the Topping:
- Whipped cream (optional)
- Ground cinnamon for dusting (optional)
Instructions:
Preparing the Crust:
- In a large bowl, combine the flour and salt. Add the chilled, cubed butter and use a pastry cutter or your fingers to blend until the mixture resembles coarse crumbs.
- Gradually add ice water, one tablespoon at a time, mixing until the dough begins to come together. Shape the dough into a disc, wrap in plastic wrap, and refrigerate for at least one hour.
- On a lightly floured surface, roll out the dough to fit a 9-inch pie dish. Transfer the dough to the pie dish, allowing excess to hang over the edges. Trim and crimp the edges as desired. Refrigerate the crust while you prepare the filling.
Making the Filling:
- Preheat your oven to 425°F (220°C).
- In a large bowl, whisk together the pumpkin puree, sweetened condensed milk, eggs, cinnamon, ginger, nutmeg, salt, and cloves until smooth and well combined.
Assembling the Pie:
- Pour the filling into the prepared pie crust. Smooth the top with a spatula if needed.
- Place the pie on the center rack of the preheated oven. Bake for 15 minutes, then reduce the temperature to 350°F (175°C) and bake for an additional 35-40 minutes, or until a knife inserted near the center comes out clean.
Finishing the Pie:
- Remove the pie from the oven and let it cool completely on a wire rack. This allows the filling to set properly.
- Serve the pie with a dollop of whipped cream and a light dusting of ground cinnamon, if desired.
Conclusion:
Pumpkin pie is a timeless dessert that brings warmth and comfort to any holiday table. This classic recipe combines the perfect blend of spices with a smooth, creamy filling and a flaky homemade crust. By following these steps, you can create a delicious pumpkin pie that will impress your family and friends. Enjoy the rich flavors and the festive spirit that comes with this delightful dessert.
FAQs:
Q1: Can I use store-bought pie crust?
Yes, you can use a store-bought pie crust for convenience. However, making your own crust can add a homemade touch and enhance the overall flavor and texture of the pie.
Q2: Can I use fresh pumpkin instead of canned pumpkin puree?
Absolutely! You can substitute canned pumpkin puree with fresh pumpkin puree. Simply roast or steam a pie pumpkin, then puree it until smooth. Be sure to drain any excess moisture for the best consistency.
Q3: How do I know when my pumpkin pie is done?
The pie is done when a knife inserted near the center comes out clean. The filling should be set but may still have a slight jiggle in the very center, which will firm up as the pie cools.
Q4: Can pumpkin pie be made in advance?
Yes, pumpkin pie can be made a day or two in advance. Store it in the refrigerator and bring it to room temperature or lightly warm it before serving.
Q5: How should I store leftover pumpkin pie?
Cover the pie with plastic wrap or aluminum foil and store it in the refrigerator for up to four days. For longer storage, you can freeze pumpkin pie for up to two months. Thaw in the refrigerator before serving.
